
Eye Tutorial: Iris 1
- Nov 4, 2017
- 3 min read
I'm going to show you a couple different ways to make eyes, so this tutorial will come in different parts, iris and the eyeball. I derived from these IMVU eyes.
To start I created a new 256x256 file, we'll be creating the iris first. Leaving the background layer white, create a new empty layer. Go to Filters>Render>Clouds>Difference Clouds.

In the pop up select Randomize, change the detail to 15 and X and Y to 4 then click ok. Repeat this step on the same layer a few times until you get an image that appeals to you.


Next select Filters>Distorts>Whirl and Pinch, with the following settings, Whirl angle: 0, Pinch amount: 0.650 and the radius to 1.3. Repeat this step on the same layer.

Once you've done that select the ellipse tool and create a circle that fits inside the first layer, click Select>Invert and then press delete. You should be left the first layer shaped into circle.


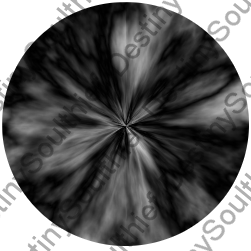
Next open a new layer clicked Filters>Render>Solid Noise and change your settings to the same as the one in the image. Next click Filters>Distorts>Polar Coordinates, leave the settings and click OK. Right click on the first layer and select Alpha Selection the Select>Invert and press delete. You should be left with a second circle the same size as the first. Set this layer mode to Overlay.

Create a new layer, we'll be make the color now for the eyes. Choose a color you prefer. I'll be using a green. Using the bucket tool fill the layer. Right click on the first layer and select Alpha Selection then Select>Invert and press delete. Set the Layer Mode to Color.

Once again with the fuzzy select tool, click on Feather Edges in the tool options, right click the first layer then Alpha Selection then click Select>Grow. This will be creating the pupil, so grow the selection until your desired size. I grew mine by 66 px. On a new layer, using the bucket tool, fill the circle with black. With Feather Edges selected the edges will blurry and not a solid line.
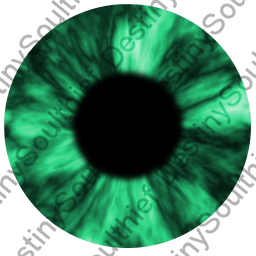
The next step is optional, this is entirely up to your preferences. I added an edge ring around the pupil. I did this on a new layer using the fuzzy select tool, deselect Feather Edges and select the empty area around the iris. Grow the select by 8px and fill black. Re-select the outside of the circle and on the edge ring layer press delete. You'll be left with a solid ring. Select Filters>Blur>Gaussian Blur and set the blur radius to 10 and lower the layer opacity to 71.

This step is also optional, adding an inner color. Select the area outside the pupil and create a new layer, invert and grow the selection by 10, or however much you desire and fill with the color you choose. Move the layer below the pupil and click Filters>Blur>Gaussian Blur and the blur radius to around 27 and change the layer mode to Color.

The Final step is to change the brightness settings on the first layer. Select Colors>Brightness-Contrast. This is a personal preference, so change it to whatever looks good to you. Hide the white background layer and click Layer>New from visible.

You've now created the iris and the new from visible layer can be easily dragged to a new canvas ready for the shadowing of the eyeball. I know this seems like a long way to create an iris so I will show you a quick way in the next tutorial. I do, however, prefer this method.
P.S. I have included pictures in good faith to help you on your creating journey. Please do not steal my textures, creating your own is much more satisfying. Stealing my texture will result in a DMCA complaint lodged against you and I would hate for it to come to that.
Comments