
Eye Tutorial: The Final, shading and highlights
- Nov 4, 2017
- 3 min read
For the eyeball, we'll start with a new canvas 256x256. Change the background colour to a light grey.
The second step, create a new layer and click select a light pink color. Using the blend tool with colors pink and white, click the small colored rectangle in the tool option and change to FG to Transparent and change the shape to radial. Click in the middle and drag to outside the canvas.
Next using the ellipse tool create a small circle in the center and fill with white. Click Filters>Blur>Gaussian Blur and change to a radius of 40. Change the layer mode to Soft Light and the opacity to 62.

Adding veins to the eyes is an optional step. There are a few ways to do this. You can click Filters>Render>Lava and play with the settings until you find one you like. Desaturate and invert. Then change the layer mode to Multiply and change the opacity to what suits you.

If you have a patterns tab connected to your layers, click and drag the water pattern to a new layer. Scale this layer quite large, desaturate and invert. Change the layer mode to Soft Light and lower the opacity to around 54.


On a new layer we will fill the top and bottom with black, leaving a kind of eye shaped area in the middle black. It doesn't have to be perfect.

Once you have done that select Filters>Blur>Gaussian Blur with a radius of around 35. Then change the layer opacity to 45.

Next is the eye lens, create a new layer and using the ellipse tool create a small circle in the middle on the canvas. Select the blend tool and change your colors to grey and white. Change the blend shape to Radial click in the circle and drag to just outside and click deselect. Change the layer mode to Multiply and the opacity to 40.

Showing all the layers here is what we have so far.

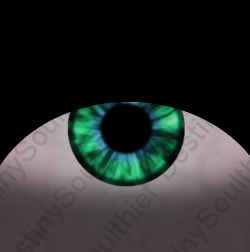
Now its time to drag your iris (if that file is still open) or File>Open as Layers and your iris file. Scale and center the iris in the middle of the canvas, with the lens layer on top of the iris.

On a new layer select the ellipse tool and create a large circle, half in the canvas and half out. Invert the selection and fill with black. Apply a Gaussian blur of around 40px and lower the layer opacity to 94. You can drag this layer lower or higher depending on your preference.


You can now export the image and see how it looks. These look good but they are still lacking in something. We will add some reflections to the eyes and a brighter white around the edge of the iris.

To create a brighter edge on a new layer, using the ellipse tool, create a circle the same size as the iris and fill with white. Click Filters>Blur>Gaussian Blur and blur the edge to your preference. To add some reflections, use the paintbrush or pencil tool and change the size to 2. Draw some smal curved lines and using the smudge tool drag the edges slightly to soften them. Lower the opacity to 90. You can also add a few dots which I have set to soft light.

Export and update your previewer to view your eyes. You are all set to go! Make sure you save your process along the way.

P.S. I have included pictures in good faith to help you on your creating journey. Please do not steal my textures, creating your own is much more satisfying. Stealing my texture will result in a DMCA complaint lodged against you and I would hate for it to come to that.
Comments