
Bow Generator
- Nov 8, 2017
- 3 min read
Adding a bow to an outfit can complete the look, adding a little something extra to bring your texture to life. The purpose of this tutorial is show you how to create a bow. By saving the file and the layers you can also make yourself a bow generator, so all you need to do in future is change the color.
I started out on canvas 256x256. On an empty layer, using the ellipse tool create an oval and fill with white. Using the Paths tool, place the basic shape for the sides of the bow. Drag the line near the corner slightly to create a rounded edge. Click Stroke Path. My lines are set to 2px.

Duplicate and flip horizontally, using the move tool, adjust the new layer to mirror the other side. On a new layer, using the Path tools, place the basic shape of the ribbon edges hanging down and Stroke Path. Duplicate and flip this layer. You should now have a basic outline of a bow.

Next using the bucket tool, fill in the outlines.

Using the Paths tool once again, place a small triangle at the end on the ribbon, click Selection from Path and press delete. Repeat this on the other side as well.

Next using the blend tool, we'll create a gradient for each part. The best way to do this is to select one of the layers of the bow, create a new layer and using Bi-Linear fill the selection. I used a dark grey and light grey as my colors for this step. The lighter grey should sit where the light would reflect. Continue to do this for each piece on new layers. You should end up with a grey bow.

Hide your background and the white layers then select Layer>New from Visible. This is now your bow overlay. Next make a new layer below the visible bow layer and fill with the color you wish your bow to be. Using the fuzzy select tool, select the outside area of the bow, click on the color layer and press delete. I set my bow layer to multiply and reduced the opacity to 73.

The next step is to add some extra shading. Using black, I drew some lines along the edge of the knot and the top part of the ribbons, applied a Gaussian blur of 5 and set to soft light.

I used the same process for the edges of the bow.

Next using the paint tool I created some folds next to the knot and on the ribbon ends. I applied a Gaussian blur, set the layer mode to soft light. Adjust the opacity if need be.
I added an extra highlight to the center of the knot, Gaussian Blur and set the layer mode to soft light.

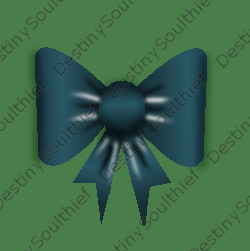
Click Layer>New from Visible and you have your complete bow ready to be used in your textures. I stated before that this will create a bow generator. By making each step in new layers you added the ability to create different styles of bows in which all you need to do is to hide or show different gradient filled in layers and change the base color. You can delete the white layers if you choose to because you will only need the gradient layers to make the bow. An example below shows the same basic bow but with different ribbons ends.


There are other ways to create bows, however I like having a file that easily generates the exact product I'm looking for.
P.S. I have included pictures in good faith to help you on your creating journey. Please do not steal my textures, creating your own is much more satisfying. Stealing my texture will result in a DMCA complaint lodged against you and I would hate for it to come to that.
Comments