
Snake Skin and Camouflage
- Nov 14, 2017
- 2 min read
Snake skin and Camouflage are simple patterns to make and extremely versatile to use. We'll start with snake skin.
I started with a canvas of 512x512, but you can use which size canvas your texture will be on. Leaving the background layer white, duplicate the layer so you have two white layers. With the second layer selected click Filters>Distorts>Mosaic. You can change the settings as you like, however I just used the default settings.


You should now have white scales. Fill the background layer with the color of your scales, whether a solid color or a gradient. Then change the layer mode of the scales to Soft Light.


Congratulations you have just created Snake skin!
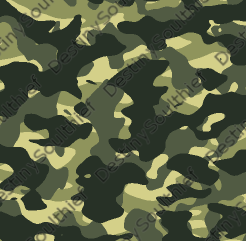
Next we move on to camouflage. This takes a few steps but they are most just repeating themselves for each color layer. Once again I started on a canvas of 512x512. I fill the background layer with a base color for my camouflage.

Create a new layer then click Filters>Render>Clouds>Solid Noise. Leave the default settings and press OK.

Next click Colors>Threshold and leave the default settings for now.

Using the fuzzy select tool, delete the black from the layer.

Click Colors>Colorify and select the second color you're using.

Create a new layer and once again click Filters>Render>Clouds>Solid Noise, this time we will change the X and Y settings to 4 and 12 and click OK.
Then Colors>Threshold>OK and delete the black again and Colors>Colorify and select the third color.

For my final layer, Filters>Render>Clouds>Solid Noise, changing the X to 6 and Y to 10, click OK, repeat Threshold and colorify for you selected color. You can then move the layers around to what looks best to you. Once you have what you want click Layers>New from Visible.
You can save this to your Patterns Tab for future use. Export the file and save as a .PNG Click Edit>Preferences

Down the column you'll see Folders, click the + next to it. Click on Patterns and you will see the file location. Save this location either by copy and paste into notepad or by writing it down.

Next open File Explorer and navigate to the patters folder. Drag your saved .PNG to this file. Close GIMP and reopen it and you should see your file in the Patterns tab.
P.S. I have included pictures in good faith to help you on your creating journey. Please do not steal my textures, creating your own is much more satisfying. Stealing my texture will result in a DMCA complaint lodged against you and I would hate for it to come to that.
Comments