
Shoe Tutorial Part 2
- Dec 4, 2017
- 3 min read
In the last tutorial we looked at what the different parts are on the mesh, creating an opacity, laying down the base color and adding some finer details. For the purpose of this tutorial I will be using THIS mesh by Wiing
I'll start with adding some shadows to the laces area. I added a thin black line under the laces layer but above the tongue, these lines are where the flaps that the eyelets are on overlap the tongue. Click Filters>Blur>Blur, the set the layer to soft light and adjust the layer opacity if you need to. I also added a thin black line down the center of the tongue. Then set the layer mode Soft Light.

The next steps are for the laces. Duplicate your laces layer and by click Colors>Brightness-Contrast, adjust it until the laces are black. Using the move tool, move the layer just slightly below the laces.

Set the Layer Mode to Soft Light.

This is how it looks so far:

I then added a thin line along the edges of the teal color as this is where the materials would overlap slightly in a real shoe. I then blurred and set to set Soft Light.

Now on to the larger shadows. Using a path tool, I followed just inside the edge of the bottom part of the map, and used a stroke width of 6.

Clicking Filters>Blur>Gaussian Blur with a radius of 10, I then set the Layer Mode to Soft Light. I did duplicate this layer to make it darker.

Next the highlights. Using the ellipse tool, create a circle over the heel, with half on the map and half outside, fill the selection with white. Deselect, duplicate the layer and flip horizontally, then merge the two layers together. Next add a smaller circle towards the top of the toe and some shorter line between the heels and toe. Use the smudge tool to soften the edges of the lines. Click Filters>Blur>Gaussian Blur and set to a radius of 10 and click OK.

Set the Layer Mode to Soft Light and update the previewer.


You can stop as this point if that is the look you are going for, most of my shoes will normally stop here. However if you wish to create a more patent leather look then continue on. To create patent leather, pvc or latex, you need to add some smaller more defined strokes. Using the brush tool, with a size of 1, draw small shorter lines along the natural curves of the foot and shoe. For me these are along the edge of the teal color, the seam on the top of the foot and the top edge of the toes. Duplicate the layer. On the original layer click Filters>Blur>Blur and set both layers to soft light. Reduce the opacity of both layers to around 30.

That is the last step for the boot.

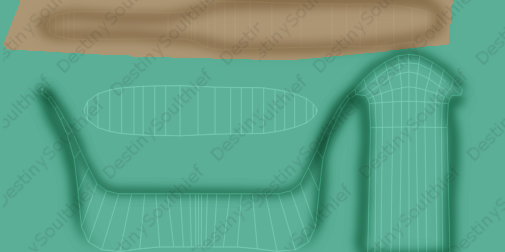
For the Heels, use the same process as the start of boot, using a colored map to show you which part is which.


Fill the layer with the color of your choosing. I also used a different color for the sole of my shoe, then using a brush with a size of about 10 on a new layer, traced the edges of map, stopping near the front. Use the smudge tool to soften the line edges, dragging them towards the toe.
Filters>Blur>Gaussian blur with a radius of 10 and then set to soft light.
Next the highlights, on a new layer using the brush tool, add some white triangles to where the sides of the toes would sit and down the middle of the heel. Gaussian blur this with a radius of 10 and set to Soft Light.

To continue with a patent leather feeling, on a new layer with a brush size of 1 add some highlights to the natural curves of the platform.

You may need to adjust the opacity on your layers depending on the colors you're working with.

To view the final shoes you can click HERE.
P.S. I have included pictures in good faith to help you on your creating journey. Please do not steal my textures, creating your own is much more satisfying. Stealing my texture will result in a DMCA complaint lodged against you and I would hate for it to come to that.
Comments