
Introduction to Creating Part 3
- Dec 21, 2017
- 6 min read
For the final installment on my introduction to creating tutorials we will go through the Toolbox and the Layers-Gradient box. Let's start with the Layers-Gradients Box.

When creating a texture your image will often be comprised of a few different layers. They are a way to build on the image without disturbing the base layer. Your layers can also have different effects combined to make your texture.

By clicking on the eye, you can hide or make visible your layer.

By clicking on the chain you can link two layers together, this is extremely helpful if you wish to scale two layers or move them but don't want to merge them together.

The Mode drop down is where you change your Layer Modes, such as soft light, multiply, burn etc. This changes the layer's blending based on the images beneath it.

The image shows a cloud layer set to Multiply, you can see how this changes the appearance of the over all image

However without any layer mode applied the image looks like this.

Opacity lets you control how translucent you want your layer to be, 100% being completely visible and 0% being completely invisible.

In this example the star on the left has the opacity set to 50%, however the star on the right has it set to 100%.

Just below your layers you'll see a small row of icons.

The first one along is used to create a new layer. You will receive a pop up in which you can change the layer, for example, if you want the layer to have a black background you can select this here, I normally leave my as a transparent layer.

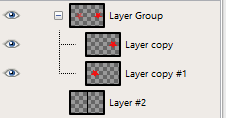
Next one along is the Layer Group icon, this is handy if you are creating a texture that has many different layers. It helps you to stay organised as you can group together layers. For example, if you had several layers of shadows you can group them together in the one folder.
The two arrows will move the selected layer up or down. You can also click and drag your layer to where you want it. The next is Duplicate, I use this one quite a lot, it creates a copy of the layer selected. It will so copy the Layer Mode on the new layer as well. Next up is Anchor Layer, whenever you cut, copy, paste etc you will have a floating layer, clicking the Anchor button will merge it with the layer of its original selection, however if you click to add a new layer, this selection will be pasted on a layer of its own.

Finally the delete button, this is self explanatory, when clicked it deletes the layer selected.
Below the layers box you may have some tabs. Mine are Brushes, Patterns and Gradients. Most of these can be accessed through the Tool Box, but they are handy here as you can click and drag them to your canvas. I normally only click and drag patterns to my canvas.


In the Brushes tab you can select your brush type, however you do drag one of these to your canvas you see the brush at its original size.

When applying a gradient you can select the style in this tab.

Over to the Tool Box. Lets start with the selection tools.

The first two, the rectangle select and the ellipse select tool, create rectangle or circle selections. Simply click the tool, click on the layer and drag to create a selection area.

The Free Select tool is next, the one that looks like a lasoo. When using this tool you can either click to create lines or you can hold down to draw the area of selection free hand.

The magic wand looking tool is the fuzzy select tool, this is great for selecting large areas. It bases the selection on a continuous line of color. So if I select the area around the star, it will select the black space. If I click inside the star the star will be selected.

If your area has more than one color, it will only select the color you click that connects to that section. As you can see in the image below I have clicked on the sky, it has only selected the area of the same color, leaving the rest of the blue out.

However you can change the threshold of the tool and this will allow less or more of an area to be selected.


The next one you will use is the paths tool. You can create selections and also create a path that can turn into a line. You click to place dots which connect to lines, you can also drag these lines to create curves. By clicking Stroke path you can turn it into a painted line, or by clicking Selection from Path you can create a selection.

Next we have the Move tool, this is the one with the 4 arrows in different directions. You will use this tool to move images around in your canvas.

Next we have the Rotate, Scale, Shear and Transform tools.

Rotate (Square 1) Rotates the layer or selection. Scale (Square 2) allows you to make the area larger or smaller. Shear (Square 3) tilts your image left or right. Transform (Square 4) allows you to manipulate the corners, bringing them closer together or further apart.

The A in your tool box is the text tool. With this tool selected, clicking on the canvas will create a new text layer. This layer will be editable even if you move on to other layers. However once you apply an effect it will no longer be a text layer, it will become a standard layer.

The bucket tool is next, this tool fills the area with a color of your choosing. The icon beside the bucket is the blend tool, this is how you create gradients.
Remember the gradient tab we talked about earlier? This tool is how you apply it to your canvas. You can select your gradient by changing the colors in the color swatches or you can pick your gradient either from the drop down menu or from the gradient panel. All you do is click and drag in your canvas to create the selected gradient.

These next ones you will use all the time, the Pencil, Paintbrush, Eraser and Airbrush.

In the example, you can see the difference between each tool. The pencil gives a more crisp edge, this is great for straight lines, the paintbrush is a little smoother and finally the airbrush is much lighter and you can see if you have overlapped your drawing. The eraser doesn't need a demonstration as it does exactly what it says, erases stuff.

With these tools you will the option to select different brush styles. These can be used for a variety of textures.

The final set of tools we will look at are clone, blur, smudge and dodge/burn.

The star labelled 1 demonstrates the clone tool, by selecting the tool click over the area you wish to clone while holding down Ctrl. This places a dot down that will move as you draw, copying the pixels it travels over to the area you are clicking. Star 2 shows the blur tool, moving this over an image will lightly blur the pixels it goes over. Star 3 shows the smudge tool. Clicking and dragging will smudge the pixels. Finally Star 4. This is the dodge burn tool, while dodge is selected it make the area lighter, while burn is selected the area will darken.

Last but not least are your colors. You can change your colors by clicking on the two swatches. These are called your Foreground and Background colors. By clicking on them a popup will show where you can change the selected colors. Clicking on the small curved arrow will flip the color swatches and clicking the small black and white squares below will reset your colors to black and white.

This just about covers everything you need to know to get your started. The best way to learn any editing software is to spend some time exploring, clicking buttons and seeing what happens.
Comments