
Shop Icons
- Dec 22, 2017
- 3 min read
Everyone has a different way of creating shop icons, this all comes down to personal preference as we all have our own style and way of doing things. That being said I'll briefly show you the process I use to create my Icons.
I save my icon as a GIMP file, by clicking on Save As, this way I can just add my picture and export it without having to remake the entire thing each time.
First up, the canvas, it must be 100 x 80, no smaller, no larger as IMVU will not accept any other size. The best way to create an icon is to open a canvas that size and just go wild and see what you come up with.
However, here is how this particular one was made. I started with a blank canvas 100 x 80 and opened a chevron pattern by clicking File>Open as Layers. Using the scale tool I scaled it down to the size of the canvas.

Next I created a small border on a new layer. I clicked Select>Select All then Select>Shrink change it to 4 pixels finally, Select>Invert and then using the bucket tool, filled the selection with my color of choice.

If you want to add your name or any writing, you can do this either by using the Text tool, or there are numerous free logo creators online that you can just search for. I use my avatars initials which I have saved, I just need to open it in the canvas, File>Open As Layers.

Now for the product image itself. In the creator screen, take a photo using IMVU's camera. Make sure that the furniture button is turned off, this is will remove the background. In you gallery, download the image you just captured. Back to GIMP and File>Open As Layers. Navigate to your image and open it.
Using the scale tool, make sure that the width and height are linked, scale the image to the size you prefer and click OK.

You can add a shadow now if you like. I have included on in this particular tutorial, however in my normal shop icons, they don't have shadows. To create the shadow, duplicate the layer. Click Colors>Brightness-Contrast, turn the brightness all the way down and the contrast all the way up.

Then using your move tool, move the image slightly to the side of the original image. In your Layers Box, move the shadow layer underneath the original image and reduce the opacity to what suits you.

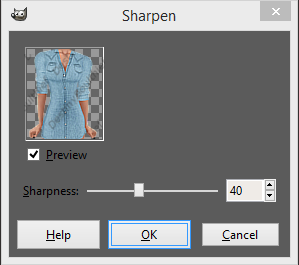
I then enhance my original produce image to sharpen the lines. Filters>Enhance>Sharpen and set to around 40.
I have made my product image and shadow sit between the background and the border. You can do this by clicking and dragging the layer to where you want.

Then you are done, export the image and it is ready for use in your shop and don't forget to save you file so you can just edit it each time you need it rather than recreating the icon all over again each time.
P.S. I have included pictures in good faith to help you on your creating journey. Please do not steal my textures, creating your own is much more satisfying. Stealing my texture will result in a DMCA complaint lodged against you and I would hate for it to come to that.
Comments